In this lesson we are going to study about Join with ON clause in a database.
Join with ON clause:
Join with ON clause:
- The join condition for the natural join is basically an equijoin of all columns with the same name.
- To specfify arbitary conditions or specfify columns to join,the ON clause is used.
- The join condition is separated from other search conditions.
The ON clause makes code easy to understand.
we are having two table DEPARTMENTS and EMPLOYEES with comman column
department_id .So, we can join this two table with ON clause.

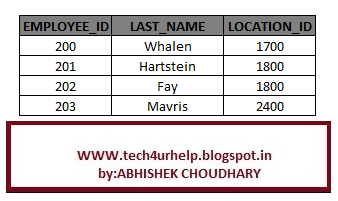
Select e.employee_id,e.last_name,e.department_id,d.location_id
From employees e join departments d
On (e.department_id=d.department_id);
OUTPUT:

Same result with equijoin :
Select e.employee_id,e.last_name,e.department_id,d.location_id
From employees e join departments d
where e.department_id=d.department_id;
Related Article
I am interested in hearing your feedback, so that I can improve my articles and learning resources for you.connect with us on facebook, twitter
SQL:
Select e.employee_id,e.last_name,e.department_id,d.location_id
From employees e join departments d
On (e.department_id=d.department_id);
OUTPUT:
Same result with equijoin :
Select e.employee_id,e.last_name,e.department_id,d.location_id
From employees e join departments d
where e.department_id=d.department_id;
Related Article
I am interested in hearing your feedback, so that I can improve my articles and learning resources for you.connect with us on facebook, twitter