Showing posts with label WAMP. Show all posts

SIMPLE SQL SELECT STATEMENT


We are now steping into the important part of the database called the select statement.
    As we know data is store in the form of table in the relational database. Before getting deeply into the database here is the sample of how the data store in the form of table. Take a look of this table 


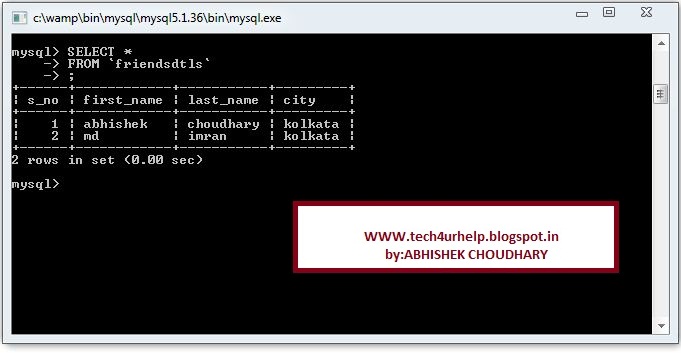
   In this table there are four columns s_no,first_name,last_name,city. The table data is store in a cell in a table cell is nothing but the intersection of row and columns. Generally the value of the table are store in a cell. We can store the different type of data in this cell. Take a look at this image Here we have given the query to select the rows from the table the database server processes this query and retrives the record from the database .


Use of SELECT statement:
  • Basic statement to extract the data from the table.
  • Retrives data from a table according to our needs.
     
Syntax: 

There are four main field to write a simple select query SELECT is the key word specifying we are going to select the data from the specific table list of column name or all columns name specify the column name or all columns name whose value we are going to select columns names are separated by commas (,) . if we want to select all column of the table then we specify asteric (*) instead of all column. From is the key word which specify where the value are store Table_Name is the name of the table where data is going to be retrieve and finaly we must put end of the select statement with semicolon (;) which is mendatory for all sql statement.

TABLE NAME:FRIENDSDTLS
Now we want to select the data of all field i.e all row and all columns sql query is :
Select * from friendsdtls;
If want to see the s_no,first_name, and city then the sql query is:
Select s_no,first_name, city from friendsdtls;
Here you go a sample video how to select data from table .you can view this video on my you tube channel as well @ http://youtu.be/r-A41Y50sXs
I am interested in hearing your feedback, so that I can improve my articles and learning resources for you.connect with us on facebook, twitter

Share

Did you enjoy reading this and found it useful? If so, please share it with your friends:

Inserting data Into table


In this section we are going to discuss data insertion into tables .
  • Insert statements is used to insert a data into a table.
  • Basic statements for data insertion .
Take a look on below image:

 Here we have given the query to insert data into the table the database server process this statements and insert a single row into the table in the database .
Syntex:

In this syntex INSERT INTO is the keyword that specifies the data insertion .Table_Name specifies the name of the table in which we are going to insert the data,columns name specifies the name of column in which we are going to give the value here we can specfies the desired columns name and if we wish to insert value for all columns of table so there is no need of specifing the each columns name .VALUES is the keyword that specifies the value we are going to give to table say value-1,value-2,value-n is the values .we must enter the value of columns according to the columns in the table.
Strucutre of table :
Table Name:  friendsdtls
Columns Name or Field :
s_no                 int(10)
first_name       varchar (50)
last_name        varchar(50)
city                  varchar(50)
create the following table if you have any problem in creating the table then take a look on  table creation . The data which we are going to insert in the friendsdtls table
So the insert query for the above table is as follows :
INSERT INTO `test`.`friendsdtls` ( `s_no`,`first_name` ,`last_name` ,`city`)
                                        VALUES ( '1', 'abhishek', 'choudhary', 'kolkata');
we can also insert the data without mentioning the fields  but in that case must be in order as follows:
INSERT INTO `test`.`friendsdtls` VALUES ('2', 'md', 'imran', 'kolkata'  );
after  executing the above lines of query  your table will look like as below
Here you go a sample video how to insert data into table .you can view this video on my you tube channel as well @  http://youtu.be/yJl0z84Rh40

I am interested in hearing your feedback, so that I can improve my articles and learning resources for you.connect with us on facebook, twitter

Share

Did you enjoy reading this and found it useful? If so, please share it with your friends:

HOW TO USE WAMP SERVER

In this section we will learn about the wamp server,
Before continue just have a quick recape of how to install wamp server from the below link
installing wamp server
1.How to start/stop/restart wamp sever
First click on wamp startup short cut which we have created during installation which is on your desktop then the wamp icon will appear on task bar looking like below image:-

Now give a left click on wamp icon you will be getting option as shown in below image:
If you want to want to start wamp click on Start All Services.
If you want to start close wamp server then click on Stop All Services.
If you want to restart then click on Restart All Services.
2.Localhost: This option simply open the webpage that is stored in the  home directory (which is “C:\wamp\www\index.php” by default).For viewing your localhost you click  wamp trayicon>>>> click on localhost, “or” open your web browser like IE,chorme,firefox and tyoe in address bar http://localhost
Here you will get the information regarding :
2.a.sever configuration
2.b.Tolls:two tools installed automatically along with wamp is phpmyadmin for operation realted to database,and phpinfo for giving info about php .
2.c.Yourproject: this section consist of all the project folder and files which you save in wwwdirectory of wamp . The location of wwwdirectory is C:\wamp\www if you installed wamp inside the c: drive as we shown in the installation wamp server.
  3.phpMyAdmin:
phpMyAdmin is an open source tool written in PHP intended to handle the administration of MYSQL with the use of a Web Browser . It can perform various tasks such as creating, modifying or deleting database,tables, fields,or rows ; executing SQL statements; or managing users and permissions.
   This option will launch phpmyadmin (which can also be
launched by going to http://localhost/phpmyadmin/ in your web browser.
phpMyAdmin is a tool to manage, query, select, and browse your MySQL
databases. It is php based and relatively simple to use 
4.www Directory – this will open the folder where your sites files are
stored. These are the files that are called when you go to localhost.

5.apache:
Apache is an Open Source WebServer. Apache is a module based web server, which means the functions or individual piece of code that allows the server to handle a certain kind of request or file in appropriate way.
      Since April 1996 Apache has been the most popular HTTP server software in use. Apache is developed and maintained by an open community of developers of the Apache Software Foundation. The pre-release versions of the Apache web server software was created by Robert McCool
       Apache also supports virtual hosting, Virtual hosting allows one Apache installation to serve many different actual websites. For example, one machine, with one Apache installation could simultaneously serve www.tech4urhelp.blogspot.com, www.example.com, forums.togotutor.com etc.
Apache also act as a front end to major application server like weblogic, jboss, websphere etc. You can server static pages using apache and dynamic content using application server. Which makes it really easy to maintani a website.

                This area has the configuration settings for Apache and will
       allow you to make configuration that you need to make to this service

6.PHP – This area has the configuration settings for PHP and will allow you to make configuration that you need to make to this service.
7.MySQL – This area has the configuration settings for MySQL and will  allow you to make configuration that you need to make to this service.

        By default the server is set up with an index.php file that will show you the services that are started for the service. This file will also show you the projects that have started on your server based on the folders that are within the www folder. You do not have to keep this file if you do not wish to. You can delete it and make your own index.php that will be shown whenever you access localhost. There are many configurations that can be made to this server setup. Explore them and have fun. I hope this tutorial was easy to follow and thanks for reading.

I am interested in hearing your feedback, so that I can improve my articles and learning resources for you.


HOW TO INSTALL WAMP (WINDOWS,APACHE,MYSQL AND PHP)

What is WAMP?


WampServer is a Windows web development environment. It allows you to create web applications with Apache, PHP and the MySQL database. It also comes with PHPMyAdmin to easily manage your databases. WampServer is an open source project, free to use (GPL licence).
This can be useful for a number of reasons:
  1. You don’t have your own web hosting to test with
  2. You want to test a website before you put it online
  3. You want to start a website that helps you organize your life, for example, but you don’t always have access to the internet
In this guide, you’ll learn how to set up Apache, MySQL, and PHP on your computer. This will be the base for your website and will create an environment for you to develop in.
step for installing wamp:-
  1. You can download WAMP for free from WAMP server website or you can directly click here to go to that page
  2. Double click on the installer
  3. Assuming you haven’t installed WAMP before, click Yes
  4. Click Next
  5. Accept the agreement and click Next


  6. I recommend installing in c:\wamp. Click Next


  7. Choose your shortcut icon preferences and click Next


  8. Click Install


  9. WAMP will now install


  10. If you have installed firebox then it will ask you to select it as a default broser


  11. Leave the default settings unless you have a need to change them and click Next


  12. Click Finish and launch WAMP Server


  13. WAMP will launch. Wait for the WAMP icon to turn white in the notification area


  14. Click on wamp icon then select localhost or you just open any browser and type http://localhost
Related Article

If this blog is helpful for you then dont forget to give comment sorry for grammatical error and also if you face any problem during installation then put your problem as a comment because your problem is owr problem.