Showing posts with label DBA. Show all posts

Export Import Schemas level using data pump

 In the previous section we have done Table level export import now we will do the schema level import export  .
We will use the directory which we have already created in table level export section. Please visit the below link  for Table level export import:


and follow the steps 2,3,4 if you are have not created any directory else you can use your created directory.

Once the directory created please follow the below steps to export schemas:

Step 1:- Export HR Schema
expdp directory=TESTDIR dumpfile=schema_exp_hr.dmp logfile=schema_exp_hr.log schemas=HR
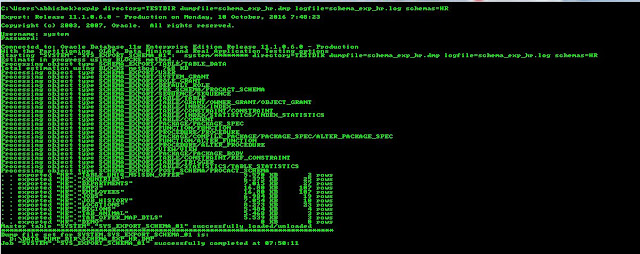
Step 2:-Once export done please check the log schema_exp_hr.log

Step 3:- Now drop the HR schema along with all the objects inside it
Drop user hr cascade;

Step 4:- Import the HR schema again
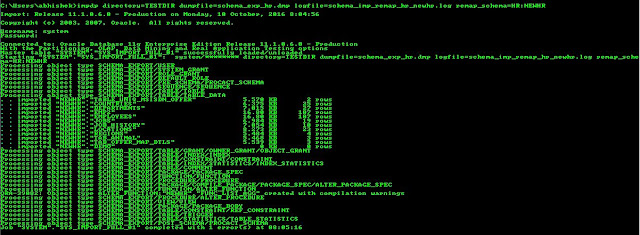
impdp directory=TESTDIR dumpfile=schema_exp_hr.dmp logfile=schema_imp_hr.log schemas=HR
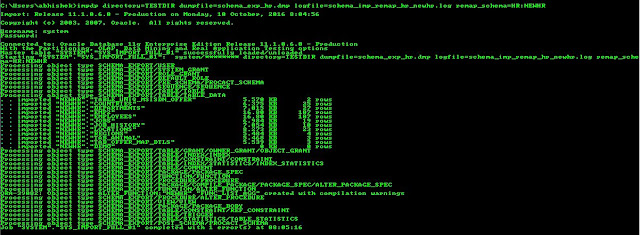
Step 5:- Once imported please check the log file :schema_imp_hr.log 
and then try to log in with the HR log in credential .

REMAP_SCHEMA command will add objects from source schema to target schema
For Expample :The hr schema into the existing HRNEW schema.
if user HRNEW already exists before the import, then the Import will import all the object
else it will create HRNEW schema and then import all the object .

impdp directory=TESTDIR dumpfile=schema_exp_hr.dmp logfile=schema_imp_remap_hr_newhr.log remap_schema=HR:NEWHR


Related Article :

I am interested in hearing your feedback about this Export and Import using data pump , So that I can improve my lab series on sql for you.connect with us on facebooktwitter

Share

Did you enjoy reading this and found it useful? If so, please share it with your friends:

Export Import Schemas level using data pump

 In the previous section we have done Table level export import now we will do the schema level import export  .
We will use the directory which we have already created in table level export section. Please visit the below link  for Table level export import:


and follow the steps 2,3,4 if you are have not created any directory else you can use your created directory.

Once the directory created please follow the below steps to export schemas:

Step 1:- Export HR Schema
expdp directory=TESTDIR dumpfile=schema_exp_hr.dmp logfile=schema_exp_hr.log schemas=HR
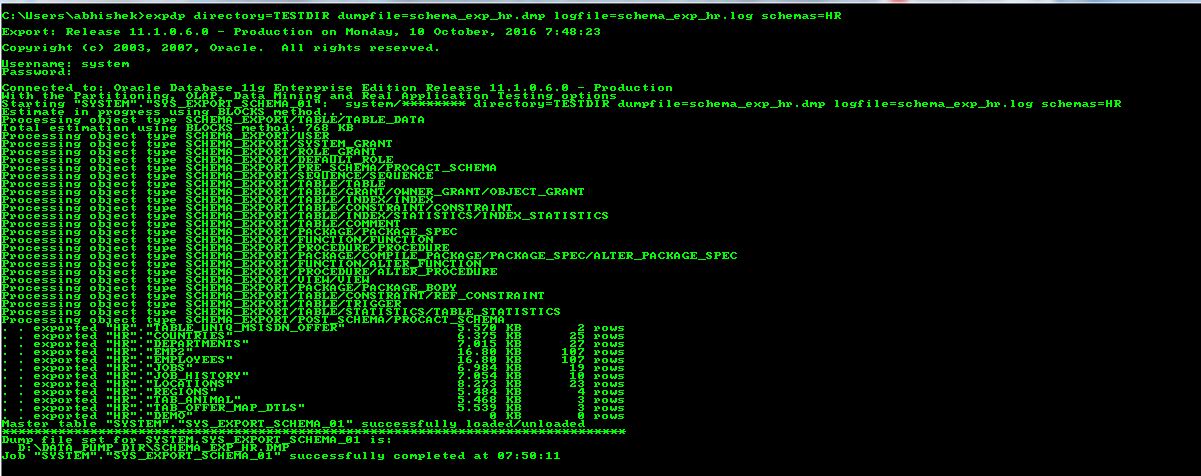
Step 2:-Once export done please check the log schema_exp_hr.log

Step 3:- Now drop the HR schema along with all the objects inside it
Drop user hr cascade;

Step 4:- Import the HR schema again
impdp directory=TESTDIR dumpfile=schema_exp_hr.dmp logfile=schema_imp_hr.log schemas=HR

Step 5:- Once imported please check the log file :schema_imp_hr.log 
and then try to log in with the HR log in credential .

REMAP_SCHEMA command will add objects from source schema to target schema
For Expample :The hr schema into the existing HRNEW schema.
if user HRNEW already exists before the import, then the Import will import all the object
else it will create HRNEW schema and then import all the object .

impdp directory=TESTDIR dumpfile=schema_exp_hr.dmp logfile=schema_imp_remap_hr_newhr.log remap_schema=HR:NEWHR

Related Article :

I am interested in hearing your feedback about this Export and Import using data pump , So that I can improve my lab series on sql for you.connect with us on facebooktwitter

Share

Did you enjoy reading this and found it useful? If so, please share it with your friends:

Export Import Table level using data pump

In this section will do Hands on Export Import Table level using data pump.

Step 1: Create a copy of the employees table under the HR schema
CREATE TABLE EMP2 AS SELECT * FROM EMPLOYEES;

Step 2. Create directory at the OS Level
D:\data_pump_dir

Step 3. Create a DIRECTORY at DB level
CREATE DIRECTORY testdir AS 'D:\data_pump_dir';

Step 4:Give Read /Write to User system
GRANT READ,WRITE ON DIRECTORY testdir TO hr;

Step 5. Export the EMP2 table from the HR user
expdp hr/hr directory=TESTDIR dumpfile=exp_tab_hr.dmp logfile=exp_tab_hr.log tables=HR.EMP2

Step 6. Verify that a .DMP file and a .LOG file exists in the DATDUMP directory
Step 7. Examine the .LOG file with any text editor
Step 8. Logon to HR and drop the EMP2 table
DROP TABLE hr.emp2;

Step 9. Import the .DMP file back into the HR user.
impdp hr/hr directory=testdir dumpfile=exp_tab_hr.dmp logfile=imp_tab_hr.log tables=HR.EMP2
Step 10. Verify that the emp2 table is re-created and re-loaded with data.
select * from hr.emp2;

Related Article :


I am interested in hearing your feedback about this Export and Import using data pump , So that I can improve my lab series on sql for you.connect with us on facebooktwitter

Share

Did you enjoy reading this and found it useful? If so, please share it with your friends: 

XML file data loading using EXTERNAL TABLE

Today we will learn about how to use the external table to load the xml data file .

Before going to for the steps lets discuss about
What is External Table ?

An external table is database object in which table structure and definition are stored inside the Oracle but the data as the name suggest reside outside the oracle .
  The External table enable us to access the external data and  as data segments not gets stored  in oracle we can not create any index,update the records and delete the records  external table  .

Here are the steps the access the xml file in oracle:
Sample File : Open a notepad type the below code and save as tab_friends.xml  which is used in this article

<?xml version="1.0" encoding="UTF-8"?>
<dataroot xmlns:od="urn:schemas-microsoft-com:officedata" xmlns:xsi="http://www.w3.org/2001/XMLSchema-instance"  xsi:noNamespaceSchemaLocation="tab_friends.xsd" generated="2016-02-12T10:56:07">
<Table1>
<SRL_NO>1</SRL_NO>
<NAME>ABHISHEK</NAME>
<COMPANY>TCS</COMPANY>
</Table1>
<Table1>
<SRL_NO>2</SRL_NO>
<NAME>SATHIS</NAME>
<COMPANY>CTS</COMPANY>
</Table1>
<Table1>
<SRL_NO>3</SRL_NO>
<NAME>MOURYA</NAME>
<COMPANY>TCS</COMPANY>
</Table1>
<Table1>
<SRL_NO>4</SRL_NO>
<NAME>SONY</NAME>
<COMPANY>ORACLE</COMPANY>
</Table1>
</dataroot>


Steps 1: Create the directory 
create or replace directory DIR_DATA_LOAD as 'D:\TEST';

We can check the info about the already created directory what is the path where we need to keep the xml file from the dba_directories views

select * from dba_directories r where r.directory_name='DIR_DATA_LOAD';

Steps 2: Read/Write access to DIRECTORY
After successful creation of directory we need to give the read ,write access to the user who will use this directory to access the xml file i.e if HR use want to access the file using DIR_DATA_LOAD directory then like below need to give access .

Grant read,write ON DIRECTORY  DIR_DATA_LOAD to HR;

Steps 3: External Table Creation for xml file  

CREATE TABLE hr.ext_tab_xml_frnd
(
srl_no integer,
name varchar2(200),
company varchar2(200)
)
organization external
(
type oracle_loader
default directory DIR_DATA_LOAD
access parameters (
                  records delimited by "</Table1>"
                  BADFILE 'bad.bad'
                  LOGFILE 'log.log'
                  fields missing field values are null
                   (
                    table1 char(2000) terminated by "<Table1>",
                    srl_no CHAR(2000) enclosed by "<SRL_NO>" and "</SRL_NO>",
                    name char(2000) enclosed by "<NAME>" and "</NAME>",
                    company char(2000) enclosed by "<COMPANY>" and "</COMPANY>",
                    table2 char(2000) terminated by "</DATAROOT>"
                    )
                   )
location ('tab_friends.xml')
)
parallel
reject limit unlimited ;

Steps 4: Reading the data of xml file  
Once the external table created we query the table like other table
select * from ext_tab_xml_frnd;

Wanted to create a table from the external table data
Create table xml_frnd 
as 
select * from ext_tab_xml_frnd;

And wanted to store the data into the another table then  select and insert
insert into xml_frnd
select * from ext_tab_xml_frnd;


I am interested in hearing your feedback about this XML file data loading using EXTERNAL TABLE , so that I can improve my lab series on sql for you.connect with us on facebooktwitter

Share

Did you enjoy reading this and found it useful? If so, please share it with your friends: 

Generating the AWR Report

In this section we will learn about how to generate awr report but before generating lets discuss something about AWR Report .

     One day i asked my DBA friends how you all are get to know about your database performance statistics and Workload .So they said oracle itself collecting all this statistical data automatically in every hours wise and we collect the information from the report and that report is named as AWR report .

What is AWR Report ?
The full form of AWR is Automatic Workload Repository .It collects, processes, and maintains performance statistics for problem detection and self-tuning purposes like SQL statements that are producing the highest load on the system, based on criteria such as elapsed time and CPU time . This data is both in memory and stored in the database. The gathered data can be displayed in both reports and views.

Steps for generating AWR Report :

Step 1: Log in sys with sysdba privilege.Here notice the path from where you calling the sqlplus that   is the place where awr report by default will be generated .
In my case path is :
C:\User\Abhishek
 Step 2: After successful log in we need the file which will used to generate the AWR report .The
location of the file is  @$ORACLE_HOME\rdbms\admin\awrrpt.sql
For RAC Environment in same path use awrrpti.sql instead of awrrpt .here i am using single instance so my file path is E:\app\Abhishek\product\11.1.0\db_1\RDBMS\ADMIN\awrrpt.sql 
The moment you call this sqlfile it will ask for report type by default it is html you can also generated it in txt file but better is html for better reading point of view and easy understanding .

Step 3: Now it will display the Instance Repository schema information like

DB Id , Inst Num , DB Name , Instance  ,Host . If it is RAC Environment then will also show the cluster id  and node information as well .
     After displaying the Information it will ask for Number of Days for which you want to generate the AWR report .Here i have given for 5 Days.

 Step 4:  Once you Enter the No of Days it will display the snap shot which are available for that time

 Frame .In my case doing in this testing database which is not alwas running but in Real it will display all snap for every hours .
 Now say for Example i want to generate the AWR report for 13-JUL-15 1am - 2pm then the available snap id id 159 and 160 will put 159 in place of Begin snap because this the beginning snap id for the 1am and 160 as End snap because this is the ending snap id  2pm.


Step 5:  Now it as ask for the file name  by default it will take based on your snap id but it will always 

better to give the meaning name so that if you share this report with developer for tuning or dba team show they can get the report generated for which time .I am following this naming convention
which is AWRRPT for report type then Date then the starting time and Ending time .

Step 6: Now you can see the below screen the AWR report has been generate in the location which i

mentioned in step 1 (C:\User\Abhishek) . Once the file is being generated type file name and open through cmd prompt / terminal .

I am interested in hearing your feedback about this AWR Report Generation , so that I can improve my lab series on sql for you.connect with us on facebooktwitter

Share

Did you enjoy reading this and found it useful? If so, please share it with your friends: