Showing posts with label Oracle10g. Show all posts

Export Import Schemas level using data pump

 In the previous section we have done Table level export import now we will do the schema level import export  .
We will use the directory which we have already created in table level export section. Please visit the below link  for Table level export import:


and follow the steps 2,3,4 if you are have not created any directory else you can use your created directory.

Once the directory created please follow the below steps to export schemas:

Step 1:- Export HR Schema
expdp directory=TESTDIR dumpfile=schema_exp_hr.dmp logfile=schema_exp_hr.log schemas=HR
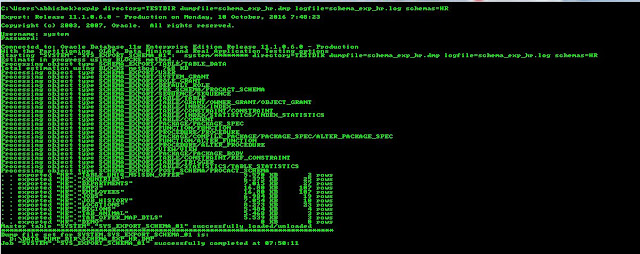
Step 2:-Once export done please check the log schema_exp_hr.log

Step 3:- Now drop the HR schema along with all the objects inside it
Drop user hr cascade;

Step 4:- Import the HR schema again
impdp directory=TESTDIR dumpfile=schema_exp_hr.dmp logfile=schema_imp_hr.log schemas=HR
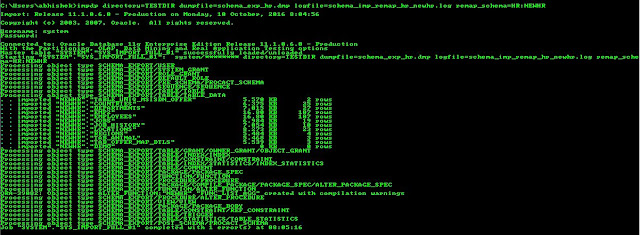
Step 5:- Once imported please check the log file :schema_imp_hr.log 
and then try to log in with the HR log in credential .

REMAP_SCHEMA command will add objects from source schema to target schema
For Expample :The hr schema into the existing HRNEW schema.
if user HRNEW already exists before the import, then the Import will import all the object
else it will create HRNEW schema and then import all the object .

impdp directory=TESTDIR dumpfile=schema_exp_hr.dmp logfile=schema_imp_remap_hr_newhr.log remap_schema=HR:NEWHR


Related Article :

I am interested in hearing your feedback about this Export and Import using data pump , So that I can improve my lab series on sql for you.connect with us on facebooktwitter

Share

Did you enjoy reading this and found it useful? If so, please share it with your friends:

Export Import Schemas level using data pump

 In the previous section we have done Table level export import now we will do the schema level import export  .
We will use the directory which we have already created in table level export section. Please visit the below link  for Table level export import:


and follow the steps 2,3,4 if you are have not created any directory else you can use your created directory.

Once the directory created please follow the below steps to export schemas:

Step 1:- Export HR Schema
expdp directory=TESTDIR dumpfile=schema_exp_hr.dmp logfile=schema_exp_hr.log schemas=HR
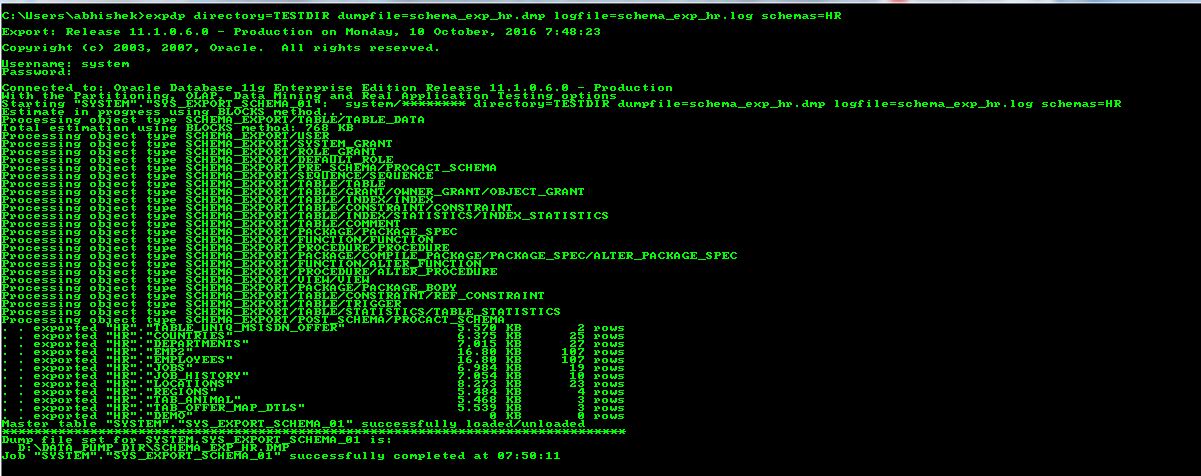
Step 2:-Once export done please check the log schema_exp_hr.log

Step 3:- Now drop the HR schema along with all the objects inside it
Drop user hr cascade;

Step 4:- Import the HR schema again
impdp directory=TESTDIR dumpfile=schema_exp_hr.dmp logfile=schema_imp_hr.log schemas=HR

Step 5:- Once imported please check the log file :schema_imp_hr.log 
and then try to log in with the HR log in credential .

REMAP_SCHEMA command will add objects from source schema to target schema
For Expample :The hr schema into the existing HRNEW schema.
if user HRNEW already exists before the import, then the Import will import all the object
else it will create HRNEW schema and then import all the object .

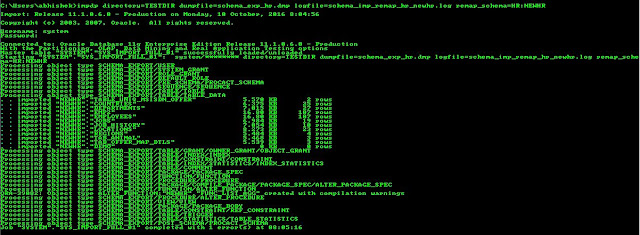
impdp directory=TESTDIR dumpfile=schema_exp_hr.dmp logfile=schema_imp_remap_hr_newhr.log remap_schema=HR:NEWHR

Related Article :

I am interested in hearing your feedback about this Export and Import using data pump , So that I can improve my lab series on sql for you.connect with us on facebooktwitter

Share

Did you enjoy reading this and found it useful? If so, please share it with your friends:

Export Import Table level using data pump

In this section will do Hands on Export Import Table level using data pump.

Step 1: Create a copy of the employees table under the HR schema
CREATE TABLE EMP2 AS SELECT * FROM EMPLOYEES;

Step 2. Create directory at the OS Level
D:\data_pump_dir

Step 3. Create a DIRECTORY at DB level
CREATE DIRECTORY testdir AS 'D:\data_pump_dir';

Step 4:Give Read /Write to User system
GRANT READ,WRITE ON DIRECTORY testdir TO hr;

Step 5. Export the EMP2 table from the HR user
expdp hr/hr directory=TESTDIR dumpfile=exp_tab_hr.dmp logfile=exp_tab_hr.log tables=HR.EMP2

Step 6. Verify that a .DMP file and a .LOG file exists in the DATDUMP directory
Step 7. Examine the .LOG file with any text editor
Step 8. Logon to HR and drop the EMP2 table
DROP TABLE hr.emp2;

Step 9. Import the .DMP file back into the HR user.
impdp hr/hr directory=testdir dumpfile=exp_tab_hr.dmp logfile=imp_tab_hr.log tables=HR.EMP2
Step 10. Verify that the emp2 table is re-created and re-loaded with data.
select * from hr.emp2;

Related Article :


I am interested in hearing your feedback about this Export and Import using data pump , So that I can improve my lab series on sql for you.connect with us on facebooktwitter

Share

Did you enjoy reading this and found it useful? If so, please share it with your friends: 

XML file data loading using EXTERNAL TABLE

Today we will learn about how to use the external table to load the xml data file .

Before going to for the steps lets discuss about
What is External Table ?

An external table is database object in which table structure and definition are stored inside the Oracle but the data as the name suggest reside outside the oracle .
  The External table enable us to access the external data and  as data segments not gets stored  in oracle we can not create any index,update the records and delete the records  external table  .

Here are the steps the access the xml file in oracle:
Sample File : Open a notepad type the below code and save as tab_friends.xml  which is used in this article

<?xml version="1.0" encoding="UTF-8"?>
<dataroot xmlns:od="urn:schemas-microsoft-com:officedata" xmlns:xsi="http://www.w3.org/2001/XMLSchema-instance"  xsi:noNamespaceSchemaLocation="tab_friends.xsd" generated="2016-02-12T10:56:07">
<Table1>
<SRL_NO>1</SRL_NO>
<NAME>ABHISHEK</NAME>
<COMPANY>TCS</COMPANY>
</Table1>
<Table1>
<SRL_NO>2</SRL_NO>
<NAME>SATHIS</NAME>
<COMPANY>CTS</COMPANY>
</Table1>
<Table1>
<SRL_NO>3</SRL_NO>
<NAME>MOURYA</NAME>
<COMPANY>TCS</COMPANY>
</Table1>
<Table1>
<SRL_NO>4</SRL_NO>
<NAME>SONY</NAME>
<COMPANY>ORACLE</COMPANY>
</Table1>
</dataroot>


Steps 1: Create the directory 
create or replace directory DIR_DATA_LOAD as 'D:\TEST';

We can check the info about the already created directory what is the path where we need to keep the xml file from the dba_directories views

select * from dba_directories r where r.directory_name='DIR_DATA_LOAD';

Steps 2: Read/Write access to DIRECTORY
After successful creation of directory we need to give the read ,write access to the user who will use this directory to access the xml file i.e if HR use want to access the file using DIR_DATA_LOAD directory then like below need to give access .

Grant read,write ON DIRECTORY  DIR_DATA_LOAD to HR;

Steps 3: External Table Creation for xml file  

CREATE TABLE hr.ext_tab_xml_frnd
(
srl_no integer,
name varchar2(200),
company varchar2(200)
)
organization external
(
type oracle_loader
default directory DIR_DATA_LOAD
access parameters (
                  records delimited by "</Table1>"
                  BADFILE 'bad.bad'
                  LOGFILE 'log.log'
                  fields missing field values are null
                   (
                    table1 char(2000) terminated by "<Table1>",
                    srl_no CHAR(2000) enclosed by "<SRL_NO>" and "</SRL_NO>",
                    name char(2000) enclosed by "<NAME>" and "</NAME>",
                    company char(2000) enclosed by "<COMPANY>" and "</COMPANY>",
                    table2 char(2000) terminated by "</DATAROOT>"
                    )
                   )
location ('tab_friends.xml')
)
parallel
reject limit unlimited ;

Steps 4: Reading the data of xml file  
Once the external table created we query the table like other table
select * from ext_tab_xml_frnd;

Wanted to create a table from the external table data
Create table xml_frnd 
as 
select * from ext_tab_xml_frnd;

And wanted to store the data into the another table then  select and insert
insert into xml_frnd
select * from ext_tab_xml_frnd;


I am interested in hearing your feedback about this XML file data loading using EXTERNAL TABLE , so that I can improve my lab series on sql for you.connect with us on facebooktwitter

Share

Did you enjoy reading this and found it useful? If so, please share it with your friends: 

Natural Join

In this lesson we are going to study about Natural Join in a database.

Natural Join:

  • This join is having a special features ,with the use of this join no need to specify the join condition explicitly.
  • This type of join offer a further specification of equi join .
  • We have to specify the keyword Natural join in the join statement.
  • Natural Join automatically joins two table based on columns in the two table which have same datatype and names.
Example: EMPLOYEE table and DEPARTMENTtable have a same column DepeartmentID and same datatype.
so we can join this two table using
NATURAL JOIN.


SQL :

SELECT *
FROM employee
NATURAL JOIN department;

Note:

  • If we write a where clause of a select statement with two or more table then the order parser will start the join operation from right to left.In this case the table name which is written last will be processed,
  •  The  join can happen only on columns having the same names and same data types in both the table .If the columns have the same name ,but different data types,then the NATURAL JOIN syntex causes an error.


Related Article
I am interested in hearing your feedback, so that I can improve my articles and learning resources for you.connect with us on facebooktwitter

Share

Did you enjoy reading this and found it useful? If so, please share it with your friends:

Self Join

In this lesson we are going to study about Self joins in a database.

Self Join: 
  • In order to join a table to itself we use the self join.
  • This type of join is used to compare values between two columns in the same table .

Example:-To find the name of Abhishek and Aritra manager we need to


  1. find in EMPLOYEE table by looking the Emp_name columns.
  2. find the manager number from Manager_id.
  3. find the name of manager with manager_id.


sql query :-


select
      emp.Emp_Name as Employee_name,
      manager.Emp_Name as manager_name
from  employees emp,
      employees manager
where emp.manager_id=manager.emp_id


OUTPUT: 


In simulate two table in the from clause there are two  aliases ,namely emp and manager for the same table ,EMPLOYEE.


Related Article
I am interested in hearing your feedback, so that I can improve my articles and learning resources for you.connect with us on facebooktwitter

Share

Did you enjoy reading this and found it useful? If so, please share it with your friends:

Non Equi joins

In this lesson we are going to study about Non Equi joins in a database.
Non Equi Join:
Non eque join is a type of join in which we can join two table with the join condition where the join condition uses other than equal operator “=”.

Example: In the below diagram we are having two table EMPLOYEES and JOB_GRADES.
 EMPLOYEES tabel contain the lastname and salary of the employee and JOB_GRADE contain the grading (Gra),lowest salary and highest salary.
A relation between the two table is that the salary columns in the EMPLOYEES table must be between the values in the Lowest_sal and Highest_sal columns of the JOB_GRADES table.The relationship is obtained using an operator other than equal(=).
Non Equi join Sample:


select e.last_name,e.salary,j.gra
from employees e,job_grades j
where e.salary between j.lowest_sal and j.highest_sal

NOTE: Other condition ,such as <= and >= can be used ,but BETWEEN is the simplest .Remember specify the low value first and hight value last when useing BETWEEN.
Table aliases used for reduce the code length and as well as the execution time .

Related Article
I am interested in hearing your feedback, so that I can improve my articles and learning resources for you.connect with us on facebooktwitter

Share

Did you enjoy reading this and found it useful? If so, please share it with your friends:

Equi Join

In this lesson we are going to study about Equi joins in a database.
Equi Join or Theta Join: 
  • An Equi Join is a type of joins the tables based on the columns in two table with same values.
  • In Equi join ,the join condition must have an Equility operator.
  • Using other comparison operators (such as <) disqualifies a join as an equi-join.
Example: In the below diagram we are having two Table,Table:A and Table:B. In Table:A we are having five records and Table:B is having four
 records which is also in Table:A  if  we do the Equi join on Table:A column X with Table:B column Y,
 this will retrun the record which are common in both the table A column X and Table:B column Y .
NOTE:   The columns X of Table A and columns Y of Table B Datatype must be same and the resulting table is having all the columns of Table:A ,and Table:B.

Syntex:


Explicit Equi join:

SELECT *
FROM Table1
JOIN Table2 ON  Table1.columnX=  Table2. columnY ;

Implicit Equi join:

SELECT * FROM  Table1 ,  Table2  WHERE  Table1.columnX=  Table2. columnY ;

just have a look on below video and try to Cross Join table by your self and you can download the sql scrpit used in this video from here DOWNLOAD LINK


    Related Article
    I am interested in hearing your feedback, so that I can improve my articles and learning resources for you.connect with us on facebooktwitter

    Share

    Did you enjoy reading this and found it useful? If so, please share it with your friends:

    Cross join

    In this lesson we are going to study about Corss joins in a database.
    Cross Join  or Cartesian Product:

    • Each row from the first table is combined with the each rows from the second table.
    • Rows in the result table is the product of rows in each table.
    • For large no of rows ,it takes longer time.
    • It does not include any join condition .
    • A Cross Join B Result table as  A*B.
    Example1:In the below diagram we are having two table's Table:A,Table:B .Table:A is having one column X

    with three data and Table:B is having one column Y with two data.So the value of  m=3 and n=2.
    So when we are doing cross join of Table:A with Table:B this will return a table which have
    m*n =3*2
           =6(Record)
    i.e each row of one table is mapped with each row of second table.


    Example2:  In the below diagram we are having two table's Table:R,Table:S .Table:A is having Two column A,column B

    with three data and Table:S is having two column B.column C with two data.So the value of  m=3 and n=2.
    So when we are doing cross join of Table:A with Table:B this will return a table which have
    m*n =3*2
           =6(Record)
    NOTE: Result table is having all columns of Table:R,Table:S

    Syntax:
    Explicit cross join:

    SELECT *

    FROM Table1
    CROSS JOIN Table2


    Implicit cross join:

    SELECT *
    FROM  Table1 , Table2;

    just have a look on below video and try to Cross Join table by your self and you can download the sql scrpit used in this video from here DOWNLOAD LINK

     Related Article
    I am interested in hearing your feedback, so that I can improve my articles and learning resources for you.connect with us on facebooktwitter

    Share

    Did you enjoy reading this and found it useful? If so, please share it with your friends:

    Joins

    In this lesson we are going to study about joins in a database . In order to join rows from multiple table or view we use join in our statement in this session we will briefly discussing the join and type of join in database .
    JOINS:
    • Joins query are written in the where clause of the select statement.
    • Joins condition :comparing two columns of two tables.
    • Database engine joins the table according to the join condition .
    • If we want to join more then two table then database engine evaluates columns of the two tables and then it joins the result to the other table.
    Have a look this image which shows the operation of the join.


    Table A and Table B is having some common columns .by giving the condition in where clause we can have the result of joined table.
    NOTE: The columns which are using in join condition must have the same datatype . otherwise it will give error and to prevent this cause if having different datatype but still we want to use that columns in join condition then use the cast function to convert the datatype and then use in join condition .


    Type of Joins:
     Joins are classified according to the different type way the join operation performed on the tables.

    we will discuss about all this Join in details in the next section .
    Related Article
    I am interested in hearing your feedback, so that I can improve my articles and learning resources for you.connect with us on facebooktwitter

    Share

    Did you enjoy reading this and found it useful? If so, please share it with your friends:

    Connect to server database using TNS


      We all know most of the database are having the client server architecture i.e client send a query to retrive some data from the database and the server process all those query and in retrun the client get the data which he request for.In this section we are not going in deep of client server architecture but yes this section is all about how you can connect to database server.
    Connect to sql server database
      It is very easy to connect to SQL Server2008. Start your SQL Server Managment studio and you will get the screen as shown right side .Enter server type,servername ,authentication
    (select sqlserver authentication if you are connecting to other then the local computer), login name,password 
    and connct to your SQL Server database.
    Connect to oracle database server:
         To connect the oracle database server we need to have to TNS Configure in the client system.There are many step to create a TNS but in this section we learn how to create TNS using TOAD for Oracle (I do belive that you have successfully installed the Toad for oracle which we have already discussed in the previous section if you miss the reading last article on installation of Oracle for Toad visit here)
         
         Step1: Start your Toad for Oralce you will get the screen like below if you are not getting the below screen then get confuse go to session menu (short key alt+s) and then click on new session and you will get the below screen.
            Step2: Now click on TNSnames Editor you will be getting the below screen to create the TNS for your oracle server Easy way to create the TNS is to go into the Text Editor tab copy and past the below informantion :

    Your_oracle_ServerName =
      (DESCRIPTION=
         (ADDRESS_LIST=
            (ADDRESS=
               (COMMUNITY=tcp.world)
                  (PROTOCOL=TCP)
                    (Host=192.153.0.1)
                    (Port=1521)
                    )
                  )
             (CONNECT_DATA=
                (SID=orcl)
              )
         )
    Note: Replace the bold red colored text with your own oracle database server.
        Step3: Click on save then click on OK.
        Step4: Go to session menu 
    (short key alt+s) and then click on new session
    You will get the same screen as shown here .Now enter your User/Schema name, password , name of you database and then click on connect.

    NOTE: if you are getting any TNS
    error then get confirm that your computer is connect to server computer.
    i.e chek your LAN setting (use ping command to chek the connection,type this in command prompt  ping 127.0.0.1 -t )
    I am interested in hearing your feedback, so that I can improve my articles and learning resources for you.connect with us on facebook, twitter

    Share

    Did you enjoy reading this and found it useful? If so, please share it with your friends:

    Steps to open SQL*plus


    Steps to open SQL*plus for the First time
    In the previous lession we have discuss different tools used  for entering the sql statement In this lession we are going to discuss how to open sql* plus for the first time after succesfully instalation of oracle 10g take the following step to open the sql* plus tool to connect to the database.
    step for open the sql * plus:-
     
    follow the below diagram to open the sql* plus.


     once sql plus is runnig it will show the log in screen that ask three things username,password ,and host string.
    in the host string we need to enter the name we have assign for tns connectivity in the file TNS.ORA .this file contain the machine name,port no,sid of the database we need to specify this when we are going to connect to server database.here we are connecting the local database that is why hightlet only the username and password field. so leave the host string blank and clicj on ok. after  successfully log in you will get the sql * plus editor for writing the sql statement .


    I am interested in hearing your feedback, so that I can improve my articles and learning resources for you.connect with us on facebook, twitter

    Share

    Did you enjoy reading this and found it useful? If so, please share it with your friends:

    Oracle10g Installation steps


         In the previous lesson we have already discuss about what is database? what is oralce?   and all if you miss those lesson then just have a look here
    what is database?
    what is oracle?
    in this section we will learn how to install the oracle10g .There are only few simple and easy step to intall the oracle10g. 
     Step1: Insert Oracle CD , the autorun window opens automatically. If you are installing from network or hard disk, click setup.exe in the installation folder.
     Step2:The Oracle Universal Installer (OUI) will run and display the Select Installation Method Window.
     Step3:  In the above screen there are two combo box
                 a.Choose Basic Installation:
                 b.Advanced Installation:
    a.Choose Basic Installation:   Select this option to quickly install Oracle Database 10g. This method requires minimal user input. It installs the software and optionally creates a general-purpose database based on the information you provide.
    For basic installation, you specify the following:
    Oracle Home LocationEnter the directory in which to install the Oracle Database 10g software. You must specify a new Oracle home directory for each new installation of Oracle Database 10g. Use the default value, which is :
    c:\oracle\product\10.2.0\db_1
    Installation Type Select Enterprise Edition :
    If you have limited space, select standard edition. Personal edition installs the same software as the Enterprise Edition, but supports only a single-user development and deployment environment.
    Create Starter DatabaseCheck this box to create a database during installation. Oracle recommends that you create a starter database for first Create Starter Database — time installations. Choose a Global Database Name, like cs157b, or just use the default value.
    Type a password. Don’t lose this password, since you will need it to connect to the database server.
    Click next 
    Step4:The Product-Specific Prerequisite Checks window appears: Click next
     
    Step5:A summary screen appears showing information such as your global settings, space requirements and the new products to be installed. Click Install to start the installation.

    Step6:The Install window appears showing installation progress.
     
    Step7:At the end of the  installation phase, the Configuration Assistants window appears. This window lists the configuration assistants that are started automatically. If you are creating a database, then the Database Configuration Assistant starts automatically in a separate window.wait for some time untill the progress bar reaches to 100% . In this step it first coping the database file ,then it is  creating  the instaces and start the instances  .
     

    Step8:At the end of database creation, you are prompted to unlock user accounts to make the accounts accessible. The SYS and SYSTEM accounts are already unlocked. Click OK to bypass password management.


    Note: Oracle 10g still keeps scott / tiger username and password (UID=scott, PWD=tiger) from the old version of oracle. In the old version of oracle, scott/tiger user ID is available by default, but not in oracle 10g. If you want to use scott /tiger account, you must unlock it by clicking “Password Management” at the last window.
    Password Management window will appear like the one shown below. Find the user name “Scott” and uncheck the “Lock Account?” column for the user name.
    Step9:Your installation and database creation is now complete. The End of Installation window displays several important URLs, one of which is for Enterprise Manager.
      Related article 

    I am interested in hearing your feedback, so that I can improve my articles and learning resources for you.connect with us on facebook, twitter

    Share

    Did you enjoy reading this and found it useful? If so, please share it with your friends:

    How to Import data from a excel file


    In this section we are going to disscuss the step how we can import data in database from the excel.for this section we have used the tools oracle10g,toad,excel.
    Step1: First create a excel file which consists of field name like
    S_NO
    FNAME
    MNAME
    SNAME
    SHORTNAME


    Step2: Add a extra field
    S_NO
    FNAME
    MNAME
    SNAME
    SHORTNAME
    FORMULA FIELD

    Step3: Add the formula in FORMULA FIELD like the below image
    Press F2 then add this line
    ="UNION ALL SELECT '"&A2&"' AS S_NO,'"&B2&"' AS FNAME,'"&C2&"' AS MNAME,'"&D2&"' AS SNAME,'"&E2&"' AS SHORTNAME FROM DUAL"


    Step4: Add this formula in all rows
    Easy way copy(ctrl+c) formula and then press ctrl+shift+down arrow  all the row will be selected then paste  (ctrl+v)

    Step5: Create a database with field name S_NO,FNAME,MNAME,SNAME,SHORTNAME .To know more about table creation visit here
    Table creation for this session code is
    CREATE TABLE INFO
    (
        S_NO   INTEGER,
        FNAME  VARCHAR2(100),
        MNAME  VARCHAR2(100),
        SNAME  VARCHAR2(100),
        SHORTNAME VARCHAR2(100)
    )
    Step6: Copy the new added fomula field  and paste it in sql editor and remove the first union all and run the sql the whole data is in your dual table
    Step7: Now write down the insert query to insert all data in table from  the dual table the sql insert look like this. To know more about sql insert visit here
    insert into INFO (S_NO,FNAME,MNAME,SNAME,SHORTNAME)
     SELECT '1' AS S_NO,'William' AS FNAME,'F.' AS MNAME,'Cordes' AS SNAME,'William F. Cordes' AS SHORTNAME FROM DUAL

    Step8:  Now chek  the data is in your table is correct or not by writing simple select query like this.
    SELECT * FROM INFO
    I am interested in hearing your feedback, so that I can improve my articles and learning resources for you.connect with us on facebooktwitter

    Share

    Did you enjoy reading this and found it useful? If so, please share it with your friends:

    Simple table creation


    In this section we are going to discuss the
    Data Definition Language (DDl):Data definition language is used to create alter and the drop the database objects.database obejects are nothing but a table ,views,indexes,etc.
    Here we will see how to create a simple table. for creating a table we must have a database like oracle.sql server2008,DB2, and etc..install in owr  system and if you dont have any database  installed in your system then you can try
    For this series I have used mysql database which is already installed in wamp server. If to see installation of wamp server then click here.


    Take a look at this image here we have given the query to mysql server and my sql server process the request and creted the table in the database.


    Syntex:
    In this syntax create table is the keyword to create a table in the database Table_name is the name of table to be created in the database ,column_name1 to column_nameN is the name of the column creted in the table in this table creation we must specify the table datatype during table creation it specifiy the type of data and the length of data to be store in the table columns in this table definition we can also specify the default expression to be store in the column .
    So before going to create a table decide the data type of the of different data which we will store in database so just have a look on below video and try to create a  table by your self.


    I am interested in hearing your feedback, so that I can improve my articles and learning resources for you.

    Share

    Did you enjoy reading this and found it useful? If so, please share it with your friends: