Steps to open SQL*plus


Steps to open SQL*plus for the First time
In the previous lession we have discuss different tools used  for entering the sql statement In this lession we are going to discuss how to open sql* plus for the first time after succesfully instalation of oracle 10g take the following step to open the sql* plus tool to connect to the database.
step for open the sql * plus:-
 
follow the below diagram to open the sql* plus.


 once sql plus is runnig it will show the log in screen that ask three things username,password ,and host string.
in the host string we need to enter the name we have assign for tns connectivity in the file TNS.ORA .this file contain the machine name,port no,sid of the database we need to specify this when we are going to connect to server database.here we are connecting the local database that is why hightlet only the username and password field. so leave the host string blank and clicj on ok. after  successfully log in you will get the sql * plus editor for writing the sql statement .


I am interested in hearing your feedback, so that I can improve my articles and learning resources for you.connect with us on facebook, twitter

Share

Did you enjoy reading this and found it useful? If so, please share it with your friends:

Oracle10g Installation steps


     In the previous lesson we have already discuss about what is database? what is oralce?   and all if you miss those lesson then just have a look here
what is database?
what is oracle?
in this section we will learn how to install the oracle10g .There are only few simple and easy step to intall the oracle10g. 
 Step1: Insert Oracle CD , the autorun window opens automatically. If you are installing from network or hard disk, click setup.exe in the installation folder.
 Step2:The Oracle Universal Installer (OUI) will run and display the Select Installation Method Window.
 Step3:  In the above screen there are two combo box
             a.Choose Basic Installation:
             b.Advanced Installation:
a.Choose Basic Installation:   Select this option to quickly install Oracle Database 10g. This method requires minimal user input. It installs the software and optionally creates a general-purpose database based on the information you provide.
For basic installation, you specify the following:
Oracle Home LocationEnter the directory in which to install the Oracle Database 10g software. You must specify a new Oracle home directory for each new installation of Oracle Database 10g. Use the default value, which is :
c:\oracle\product\10.2.0\db_1
Installation Type Select Enterprise Edition :
If you have limited space, select standard edition. Personal edition installs the same software as the Enterprise Edition, but supports only a single-user development and deployment environment.
Create Starter DatabaseCheck this box to create a database during installation. Oracle recommends that you create a starter database for first Create Starter Database — time installations. Choose a Global Database Name, like cs157b, or just use the default value.
Type a password. Don’t lose this password, since you will need it to connect to the database server.
Click next 
Step4:The Product-Specific Prerequisite Checks window appears: Click next
 
Step5:A summary screen appears showing information such as your global settings, space requirements and the new products to be installed. Click Install to start the installation.

Step6:The Install window appears showing installation progress.
 
Step7:At the end of the  installation phase, the Configuration Assistants window appears. This window lists the configuration assistants that are started automatically. If you are creating a database, then the Database Configuration Assistant starts automatically in a separate window.wait for some time untill the progress bar reaches to 100% . In this step it first coping the database file ,then it is  creating  the instaces and start the instances  .
 

Step8:At the end of database creation, you are prompted to unlock user accounts to make the accounts accessible. The SYS and SYSTEM accounts are already unlocked. Click OK to bypass password management.


Note: Oracle 10g still keeps scott / tiger username and password (UID=scott, PWD=tiger) from the old version of oracle. In the old version of oracle, scott/tiger user ID is available by default, but not in oracle 10g. If you want to use scott /tiger account, you must unlock it by clicking “Password Management” at the last window.
Password Management window will appear like the one shown below. Find the user name “Scott” and uncheck the “Lock Account?” column for the user name.
Step9:Your installation and database creation is now complete. The End of Installation window displays several important URLs, one of which is for Enterprise Manager.
  Related article 

I am interested in hearing your feedback, so that I can improve my articles and learning resources for you.connect with us on facebook, twitter

Share

Did you enjoy reading this and found it useful? If so, please share it with your friends:

SIMPLE SQL SELECT STATEMENT


We are now steping into the important part of the database called the select statement.
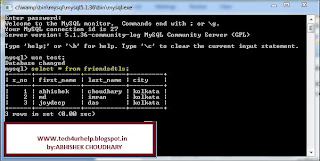
    As we know data is store in the form of table in the relational database. Before getting deeply into the database here is the sample of how the data store in the form of table. Take a look of this table 


   In this table there are four columns s_no,first_name,last_name,city. The table data is store in a cell in a table cell is nothing but the intersection of row and columns. Generally the value of the table are store in a cell. We can store the different type of data in this cell. Take a look at this image Here we have given the query to select the rows from the table the database server processes this query and retrives the record from the database .


Use of SELECT statement:
  • Basic statement to extract the data from the table.
  • Retrives data from a table according to our needs.
     
Syntax: 

There are four main field to write a simple select query SELECT is the key word specifying we are going to select the data from the specific table list of column name or all columns name specify the column name or all columns name whose value we are going to select columns names are separated by commas (,) . if we want to select all column of the table then we specify asteric (*) instead of all column. From is the key word which specify where the value are store Table_Name is the name of the table where data is going to be retrieve and finaly we must put end of the select statement with semicolon (;) which is mendatory for all sql statement.

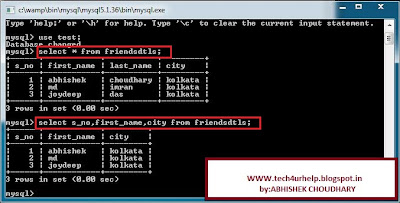
TABLE NAME:FRIENDSDTLS
Now we want to select the data of all field i.e all row and all columns sql query is :
Select * from friendsdtls;
If want to see the s_no,first_name, and city then the sql query is:
Select s_no,first_name, city from friendsdtls;
Here you go a sample video how to select data from table .you can view this video on my you tube channel as well @ http://youtu.be/r-A41Y50sXs
I am interested in hearing your feedback, so that I can improve my articles and learning resources for you.connect with us on facebook, twitter

Share

Did you enjoy reading this and found it useful? If so, please share it with your friends:

How to Import data from a excel file


In this section we are going to disscuss the step how we can import data in database from the excel.for this section we have used the tools oracle10g,toad,excel.
Step1: First create a excel file which consists of field name like
S_NO
FNAME
MNAME
SNAME
SHORTNAME


Step2: Add a extra field
S_NO
FNAME
MNAME
SNAME
SHORTNAME
FORMULA FIELD

Step3: Add the formula in FORMULA FIELD like the below image
Press F2 then add this line
="UNION ALL SELECT '"&A2&"' AS S_NO,'"&B2&"' AS FNAME,'"&C2&"' AS MNAME,'"&D2&"' AS SNAME,'"&E2&"' AS SHORTNAME FROM DUAL"


Step4: Add this formula in all rows
Easy way copy(ctrl+c) formula and then press ctrl+shift+down arrow  all the row will be selected then paste  (ctrl+v)

Step5: Create a database with field name S_NO,FNAME,MNAME,SNAME,SHORTNAME .To know more about table creation visit here
Table creation for this session code is
CREATE TABLE INFO
(
    S_NO   INTEGER,
    FNAME  VARCHAR2(100),
    MNAME  VARCHAR2(100),
    SNAME  VARCHAR2(100),
    SHORTNAME VARCHAR2(100)
)
Step6: Copy the new added fomula field  and paste it in sql editor and remove the first union all and run the sql the whole data is in your dual table
Step7: Now write down the insert query to insert all data in table from  the dual table the sql insert look like this. To know more about sql insert visit here
insert into INFO (S_NO,FNAME,MNAME,SNAME,SHORTNAME)
 SELECT '1' AS S_NO,'William' AS FNAME,'F.' AS MNAME,'Cordes' AS SNAME,'William F. Cordes' AS SHORTNAME FROM DUAL

Step8:  Now chek  the data is in your table is correct or not by writing simple select query like this.
SELECT * FROM INFO
I am interested in hearing your feedback, so that I can improve my articles and learning resources for you.connect with us on facebooktwitter

Share

Did you enjoy reading this and found it useful? If so, please share it with your friends:

Inserting data Into table


In this section we are going to discuss data insertion into tables .
  • Insert statements is used to insert a data into a table.
  • Basic statements for data insertion .
Take a look on below image:

 Here we have given the query to insert data into the table the database server process this statements and insert a single row into the table in the database .
Syntex:

In this syntex INSERT INTO is the keyword that specifies the data insertion .Table_Name specifies the name of the table in which we are going to insert the data,columns name specifies the name of column in which we are going to give the value here we can specfies the desired columns name and if we wish to insert value for all columns of table so there is no need of specifing the each columns name .VALUES is the keyword that specifies the value we are going to give to table say value-1,value-2,value-n is the values .we must enter the value of columns according to the columns in the table.
Strucutre of table :
Table Name:  friendsdtls
Columns Name or Field :
s_no                 int(10)
first_name       varchar (50)
last_name        varchar(50)
city                  varchar(50)
create the following table if you have any problem in creating the table then take a look on  table creation . The data which we are going to insert in the friendsdtls table
So the insert query for the above table is as follows :
INSERT INTO `test`.`friendsdtls` ( `s_no`,`first_name` ,`last_name` ,`city`)
                                        VALUES ( '1', 'abhishek', 'choudhary', 'kolkata');
we can also insert the data without mentioning the fields  but in that case must be in order as follows:
INSERT INTO `test`.`friendsdtls` VALUES ('2', 'md', 'imran', 'kolkata'  );
after  executing the above lines of query  your table will look like as below
Here you go a sample video how to insert data into table .you can view this video on my you tube channel as well @  http://youtu.be/yJl0z84Rh40

I am interested in hearing your feedback, so that I can improve my articles and learning resources for you.connect with us on facebook, twitter

Share

Did you enjoy reading this and found it useful? If so, please share it with your friends: