Export Import Table level using data pump

In this section will do Hands on Export Import Table level using data pump.

Step 1: Create a copy of the employees table under the HR schema
CREATE TABLE EMP2 AS SELECT * FROM EMPLOYEES;

Step 2. Create directory at the OS Level
D:\data_pump_dir

Step 3. Create a DIRECTORY at DB level
CREATE DIRECTORY testdir AS 'D:\data_pump_dir';

Step 4:Give Read /Write to User system
GRANT READ,WRITE ON DIRECTORY testdir TO hr;

Step 5. Export the EMP2 table from the HR user
expdp hr/hr directory=TESTDIR dumpfile=exp_tab_hr.dmp logfile=exp_tab_hr.log tables=HR.EMP2

Step 6. Verify that a .DMP file and a .LOG file exists in the DATDUMP directory
Step 7. Examine the .LOG file with any text editor
Step 8. Logon to HR and drop the EMP2 table
DROP TABLE hr.emp2;

Step 9. Import the .DMP file back into the HR user.
impdp hr/hr directory=testdir dumpfile=exp_tab_hr.dmp logfile=imp_tab_hr.log tables=HR.EMP2
Step 10. Verify that the emp2 table is re-created and re-loaded with data.
select * from hr.emp2;

Related Article :


I am interested in hearing your feedback about this Export and Import using data pump , So that I can improve my lab series on sql for you.connect with us on facebook, twitter

Share

Did you enjoy reading this and found it useful? If so, please share it with your friends: 

XML file data loading using EXTERNAL TABLE

Today we will learn about how to use the external table to load the xml data file .

Before going to for the steps lets discuss about
What is External Table ?

An external table is database object in which table structure and definition are stored inside the Oracle but the data as the name suggest reside outside the oracle .
  The External table enable us to access the external data and  as data segments not gets stored  in oracle we can not create any index,update the records and delete the records  external table  .

Here are the steps the access the xml file in oracle:
Sample File : Open a notepad type the below code and save as tab_friends.xml  which is used in this article

<?xml version="1.0" encoding="UTF-8"?>
<dataroot xmlns:od="urn:schemas-microsoft-com:officedata" xmlns:xsi="http://www.w3.org/2001/XMLSchema-instance"  xsi:noNamespaceSchemaLocation="tab_friends.xsd" generated="2016-02-12T10:56:07">
<Table1>
<SRL_NO>1</SRL_NO>
<NAME>ABHISHEK</NAME>
<COMPANY>TCS</COMPANY>
</Table1>
<Table1>
<SRL_NO>2</SRL_NO>
<NAME>SATHIS</NAME>
<COMPANY>CTS</COMPANY>
</Table1>
<Table1>
<SRL_NO>3</SRL_NO>
<NAME>MOURYA</NAME>
<COMPANY>TCS</COMPANY>
</Table1>
<Table1>
<SRL_NO>4</SRL_NO>
<NAME>SONY</NAME>
<COMPANY>ORACLE</COMPANY>
</Table1>
</dataroot>


Steps 1: Create the directory 
create or replace directory DIR_DATA_LOAD as 'D:\TEST';

We can check the info about the already created directory what is the path where we need to keep the xml file from the dba_directories views

select * from dba_directories r where r.directory_name='DIR_DATA_LOAD';

Steps 2: Read/Write access to DIRECTORY
After successful creation of directory we need to give the read ,write access to the user who will use this directory to access the xml file i.e if HR use want to access the file using DIR_DATA_LOAD directory then like below need to give access .

Grant read,write ON DIRECTORY  DIR_DATA_LOAD to HR;

Steps 3: External Table Creation for xml file  

CREATE TABLE hr.ext_tab_xml_frnd
(
srl_no integer,
name varchar2(200),
company varchar2(200)
)
organization external
(
type oracle_loader
default directory DIR_DATA_LOAD
access parameters (
                  records delimited by "</Table1>"
                  BADFILE 'bad.bad'
                  LOGFILE 'log.log'
                  fields missing field values are null
                   (
                    table1 char(2000) terminated by "<Table1>",
                    srl_no CHAR(2000) enclosed by "<SRL_NO>" and "</SRL_NO>",
                    name char(2000) enclosed by "<NAME>" and "</NAME>",
                    company char(2000) enclosed by "<COMPANY>" and "</COMPANY>",
                    table2 char(2000) terminated by "</DATAROOT>"
                    )
                   )
location ('tab_friends.xml')
)
parallel
reject limit unlimited ;

Steps 4: Reading the data of xml file  
Once the external table created we query the table like other table
select * from ext_tab_xml_frnd;

Wanted to create a table from the external table data
Create table xml_frnd 
as 
select * from ext_tab_xml_frnd;

And wanted to store the data into the another table then  select and insert
insert into xml_frnd
select * from ext_tab_xml_frnd;


I am interested in hearing your feedback about this XML file data loading using EXTERNAL TABLE , so that I can improve my lab series on sql for you.connect with us on facebook, twitter

Share

Did you enjoy reading this and found it useful? If so, please share it with your friends: 

Generating the AWR Report

In this section we will learn about how to generate awr report but before generating lets discuss something about AWR Report .

     One day i asked my DBA friends how you all are get to know about your database performance statistics and Workload .So they said oracle itself collecting all this statistical data automatically in every hours wise and we collect the information from the report and that report is named as AWR report .

What is AWR Report ?
The full form of AWR is Automatic Workload Repository .It collects, processes, and maintains performance statistics for problem detection and self-tuning purposes like SQL statements that are producing the highest load on the system, based on criteria such as elapsed time and CPU time . This data is both in memory and stored in the database. The gathered data can be displayed in both reports and views.

Steps for generating AWR Report :

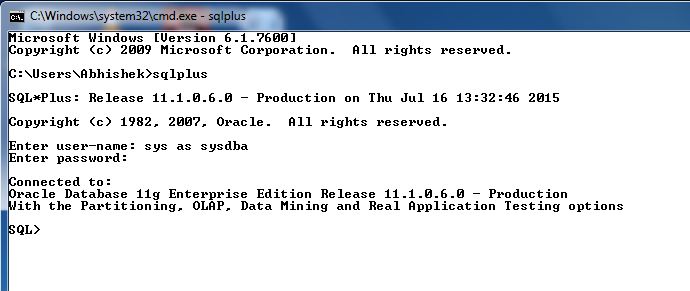
Step 1: Log in sys with sysdba privilege.Here notice the path from where you calling the sqlplus that   is the place where awr report by default will be generated .
In my case path is :
C:\User\Abhishek
 Step 2: After successful log in we need the file which will used to generate the AWR report .The
location of the file is  @$ORACLE_HOME\rdbms\admin\awrrpt.sql
For RAC Environment in same path use awrrpti.sql instead of awrrpt .here i am using single instance so my file path is E:\app\Abhishek\product\11.1.0\db_1\RDBMS\ADMIN\awrrpt.sql 
The moment you call this sqlfile it will ask for report type by default it is html you can also generated it in txt file but better is html for better reading point of view and easy understanding .

Step 3: Now it will display the Instance Repository schema information like

DB Id , Inst Num , DB Name , Instance  ,Host . If it is RAC Environment then will also show the cluster id  and node information as well .
     After displaying the Information it will ask for Number of Days for which you want to generate the AWR report .Here i have given for 5 Days.

 Step 4:  Once you Enter the No of Days it will display the snap shot which are available for that time

 Frame .In my case doing in this testing database which is not alwas running but in Real it will display all snap for every hours .
 Now say for Example i want to generate the AWR report for 13-JUL-15 1am - 2pm then the available snap id id 159 and 160 will put 159 in place of Begin snap because this the beginning snap id for the 1am and 160 as End snap because this is the ending snap id  2pm.


Step 5:  Now it as ask for the file name  by default it will take based on your snap id but it will always 

better to give the meaning name so that if you share this report with developer for tuning or dba team show they can get the report generated for which time .I am following this naming convention
which is AWRRPT for report type then Date then the starting time and Ending time .

Step 6: Now you can see the below screen the AWR report has been generate in the location which i

mentioned in step 1 (C:\User\Abhishek) . Once the file is being generated type file name and open through cmd prompt / terminal .

I am interested in hearing your feedback about this AWR Report Generation , so that I can improve my lab series on sql for you.connect with us on facebook, twitter

Share

Did you enjoy reading this and found it useful? If so, please share it with your friends: 

Table Name from Rowid

In this section we will learn about .

How we can get the Table Name from Rowid?

Before going to get the answer of the above question lets have a quick review on Rowid.

ROWID:
  • Rowid is a pseudocolumn that returns the address of the row.
  • A rowid value uniquely identifies a row in the database.
  • The rowid is intended to be immutable (that is, unchangeable) and the user should not try to change it once it is assigned.
In the above image the rowid return by the dual table is :

AAAABzAABAAAAMiAAA .

Six positions for the data object number .  
Three positions for the relative file number.   
Six positions for the block number .   
Three positions for the row number.

Now , Let back track and get the name of given rowid for example .

There are so many ways to get the Table name from Rowid . 
So, from the above discussion we get the conclusion that  rowid return the address of row and rows are stored in table and table is database object .
So if we get the all table name and scan for rowid then we will get the answer.

Let gets start .
Line 3: created cursor for collecting the table name .
Line 8: Started the loop to access the table one by one for searching the rowid.
Line 16: Condition checking for exists the rowid in table or not .

The other way is to use oracle in built function 

  • Get the object id from rowid using DBMS_ROWID.rowid_object() function.
  • Then collect the object id information from dba_objects view.


I am interested in hearing your feedback about this question & answer, so that I can improve my lab series on sql for you.connect with us on facebook, twitter

Share

Did you enjoy reading this and found it useful? If so, please share it with your friends:

Alias name

     A column alias name is an alternative name given to the column in a select statement.It is used to rename a column heading in select statement and it allows the user to understand the output easily.

Syntax:
    Select column_name AS "Alias Name" from table_name ;

   The keyword AS used between the column name and alias name is optional.we can give the blank space instead of AS keyword.Requires double quotation marks if it contains spaces or special characters or if it is case sensitive.

Example :
SELECT last_name as name ,commission_pct as comm  FROM     employees;

SELECT last_name as name ,salary*12 "Annual Salary"  as comm  FROM     employees;


Default column heading :
  • Character and date column headings are left aligned.
  • Number column heading are right align .
  • Default heading display in UPPERCASE .

      I am interested in hearing your feedback, so that I can improve my articles and learning resources for you.connect with us on facebook, twitter

Share

Did you enjoy reading this and found it useful? If so, please share it with your friends:

Merge statement

          In oracle 9i Release 2, Merge statement is introduced to select rows from one or more source for update or insertion into one or more tables .Merge statement have the ability to delete rows,as well as update and insert them So it is also known as "UPSERT"
  • Useful in data warehousing .
  • Increases performance and ease of use
Syntax:

MERGE INTO table_name table_alias
USING (table|view|sub_query) alias
ON (join condition)
WHEN MATCHED THEN
UPDATE SET
col1 = col_val1,
col2 = col2_val
WHEN NOT MATCHED THEN
INSERT (column_list)
VALUES (column_values);

Example :


MERGE INTO emp_new c
USING employees e
ON (c.employee_id = e.employee_id)
WHEN MATCHED THEN
UPDATE SET
c.first_name = e.first_name,
c.last_name = e.last_name,
c.department_id = e.department_id
WHEN NOT MATCHED THEN
INSERT VALUES(e.employee_id, e.first_name, e.last_name,
e.email, e.phone_number, e.hire_date, e.job_id,
e.salary, e.commission_pct, e.manager_id,
e.department_id);

NOTE:
Deletion were always done separately via the DELETE statement.

 I am interested in hearing your feedback, so that I can improve my articles and learning resources for you.connect with us on facebook, twitter

Share

Did you enjoy reading this and found it useful? If so, please share it with your friends:

ORA-28001: the password has expired (DBD ERROR: OCISessionBegin)


I received the above error when try to start Oracle Enterprise Manager (OEM)

And the reasons might be sysman,dbsnmp  password expired or lock due to user password setting The simple steps to unlock the sysman user.

STEP 1: Sign in SQLPlus as sysman in my case only password expired as shown in below image  and if remember the old sysman password and accoring
to password setting if allow you to change the
password then change the password
else ,
Sign in as SYSDBA and run the below sql
ALTER USER SYSMAN IDENTIFIED BY NEW_PASSWORD ACCOUNT UNLOCK;
STEP 2: Once you change the password and unlock the sysman password try to log in to OEM


STEP 3: Try to log in as sys  as sysdba ,and once able to log in this will prompt for all user expired password and new password ,assign the new password for expired user password .


STEP 4: Log out and log in again and enjoy working with OEM


I am interested in hearing your feedback, so that I can improve my articles and learning resources for you.connect with us on facebook, twitter

Share

Did you enjoy reading this and found it useful to solve your error ? If so, please share it with your friends: